This Local Notion Manual explains installation, Notion access, everyday commands and the local repository. Work through it in order for a first setup, or use Contents to find a command. The companion guide linked above covers building websites with Notion pages, sections, styles and Gallery cards.
Contents
1. Introduction
Local Notion is a command-line tool that brings Notion content onto storage you control. It downloads pages, databases, blocks and attachments, then can render that content for backup, offline reading or a website. Notion remains the editing source: pulling content locally is not a two-way workspace editor or a restore operation.
Choose the result first. A personal archive, an offline publication and a hosted website use the same content pipeline but need different link and media settings. Choose the appropriate profile when creating a repository, then review its actual configuration before synchronizing.
| Goal | Starting profile |
| Keep a local archive of accessible Notion content | backup |
| Also download external media for offline use | offline |
| Produce a flatter publication layout | publishing |
| Generate links for a website host | website |
A normal first cycle is: install the tool, connect Notion access, initialize an empty local folder, list what the connection can see, pull a small selection, then inspect the result. Use recurring sync only after a one-off pull behaves as expected. A repository created with default Git settings stays local; enabling Git and automatic push can make initialization and later changes commit and push. Hosting and server activation still need their own setup.
2. Hardware Requirements
| Type | Details |
| Processor / architecture | Download the build for your operating system and CPU architecture. Available targets depend on the release. |
| Memory / workload | Requirements grow with the number and size of pages, databases and attachments. Test a representative small pull before scheduling a large workspace. |
| Storage | Allow space for the application, raw objects, downloaded media, rendered output and any Git history. Attachments often dominate storage. |
| Operating system | Use the supported OS and architecture listed for your chosen release. Do not assume the old Windows 8-era requirement applies to a current package. |
| Software / connectivity | Current native packages include their runtime. Network access is needed to contact Notion and download remote content; Git and a website server are optional components. |
The older fixed RAM and disk figures were not a sizing guarantee for your content. Leave working space for downloads and file replacement, and check available disk space before a large pull. A local copy may contain raw objects, attachments and rendered copies of the same material.
Rendering stored objects can avoid another Notion fetch, but a generated page may still use online fonts, theme assets or external media. Test the intended offline result rather than assuming every profile makes a completely self-contained package.
3. Installation
Download the archive for your platform, extract the complete bundle and read its README.txt. Keep the executable, native libraries and supporting files together. The exact installer and supported platforms belong to that release, so follow its bundled instructions when they differ from these general steps.
localnotion, so copying only one executable is not a general installation method. Add the chosen application folder to PATH if you want to run it from other directories.
Verify the executable you are using. Open a new terminal after changing PATH, then check the version and command help. If an older installation is still being found first, correct that terminal's executable selection before investigating Notion access.
where.exe localnotion
localnotion --version
localnotion --help
On macOS or Linux, locate the command with:
command -v localnotion
localnotion --version
localnotion --help
Easy Method
-
Extract every file from the Windows archive into a temporary folder.
-
Run the included
install.batand follow that release's README. Open a new terminal when it finishes so any PATH update is visible.
Manual Method
-
For a portable installation, choose a permanent application folder you can write to, for example
C:\Tools\LocalNotion.The remaining example usesC:\Tools\LocalNotion. Substitute your own application folder consistently. -
Copy the complete extracted bundle, including
localnotion.exeand its neighboring files, intoC:\Tools\LocalNotion. -
Add
C:\Tools\LocalNotionto your user PATH if required. The following steps describe the Environment Variables dialog; menu names can vary between Windows versions.Open Windows search and find the environment-variable settings.
Open the environment-variable editor for your account.
Choose
Environment Variablesif that button is shown.In your user variables, select
Pathand chooseEdit.Add a new entry for
C:\Tools\LocalNotion, save the dialogs and reopen your terminal.
Use the macOS archive for your processor and keep the extracted bundle together. You can run localnotion directly from that folder or use the included installer.
Use the installer method below or retain a portable application folder. Do not copy only the executable into /usr/local/bin when the bundle has supporting libraries.
Easy Method
-
Extract the complete macOS archive into a temporary folder.
-
Open Terminal in the extracted folder and follow the included
README.txtinstructions forinstall.sh. -
Run the bundled installer as documented. Current user-installation scripts can be invoked from Terminal; older releases may use a different process.
Use the installation location and permission requirements documented by your chosen package. A user installation and a system-wide installation are different choices.If macOS asks for approval, review the downloaded package and follow the chosen release README and your normal macOS approval process.
-
Approve that application through the applicable macOS security prompt or settings if you trust the downloaded release. Do not disable system security globally.
Manual Method
-
For portable use, extract the entire archive into a permanent application folder you control.
-
Keep
localnotionbeside all of the libraries and supporting files supplied in its archive. -
Open Terminal in that application folder before testing the executable.
-
Run
./localnotion --helpfrom the extracted folder. There is no need to copy a single file into the obsolete/usr/bin/localpath shown in older instructions. -
If you want the command available elsewhere, add the complete application folder to your user PATH according to your shell's configuration.
Use the package's documented approval process if macOS prevents this downloaded application from running.
-
Open a new terminal and check
localnotion --versionandlocalnotion --help.
Use the Linux archive for your OS and processor. Keep its files together, then choose the included installer or portable use below; a lone executable copied to /usr/local/bin may omit required libraries.
Easy Method
-
Extract the complete Linux archive into a temporary folder.
-
Open a terminal in that folder and follow the bundled
README.txt, normally usingsh ./install.shfor the current user installer.
sh does not require a file-manager “Run as a program” action.
Manual Method
-
For portable use, extract all archive contents into a permanent folder you control.
-
Open a terminal in the extracted application folder.
-
Check the executable while it remains beside its supplied libraries:
./localnotion --help -
If the executable lacks execute permission, grant it on this extracted application and retry:
chmod +x ./localnotion
localnotion --version and localnotion --help. If the command is not found, use the executable's full path or correct PATH. If it reports the wrong version, locate the command being selected rather than reinstalling blindly.
4. Generating your Notion Integration token
Local Notion uses the tested internal connection workflow. Notion's current menu names differ from the older screenshots retained below.
4.1 Sign in to the intended workspace as a workspace owner.
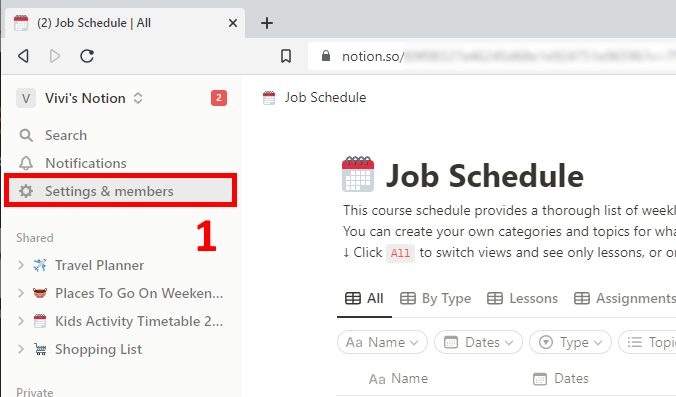
4.2 Open the Developer portal: Build → Internal connections.
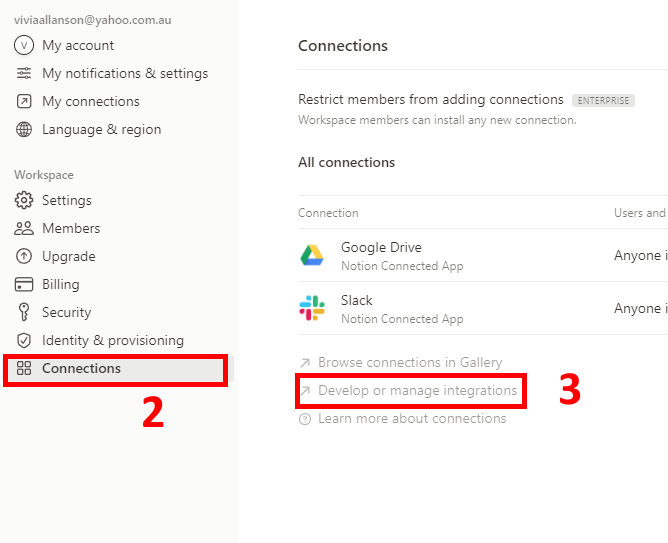
4.3 Create an internal connection and select its workspace.
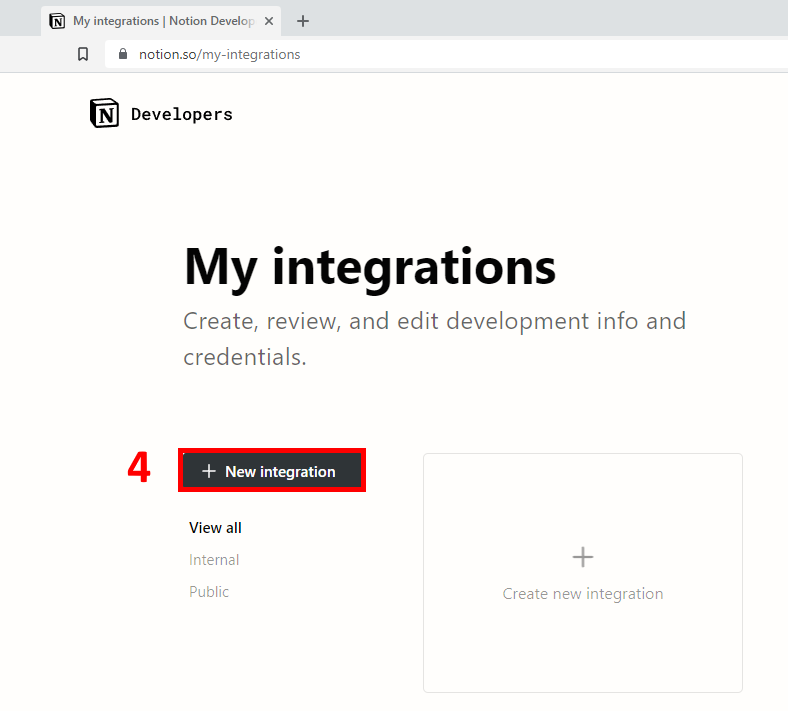
4.4 Give the connection a recognizable name, such as Local Notion.
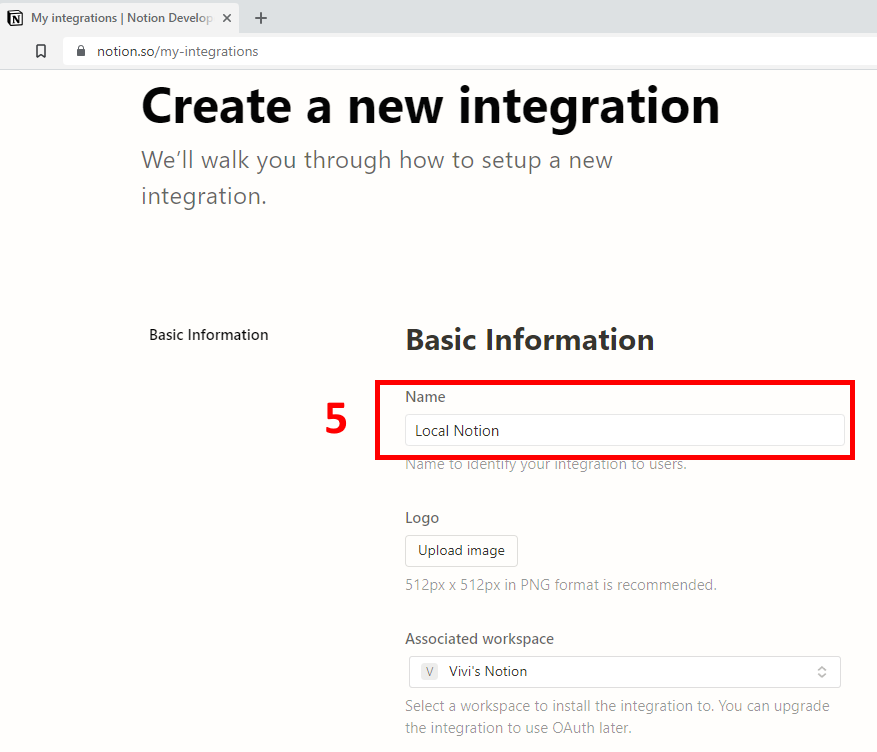
4.5 Open Configuration and select the required capabilities.
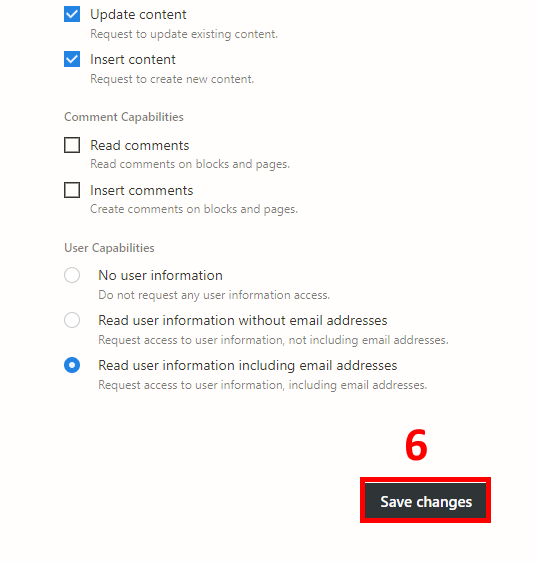
4.6 Copy the connection token from Configuration.
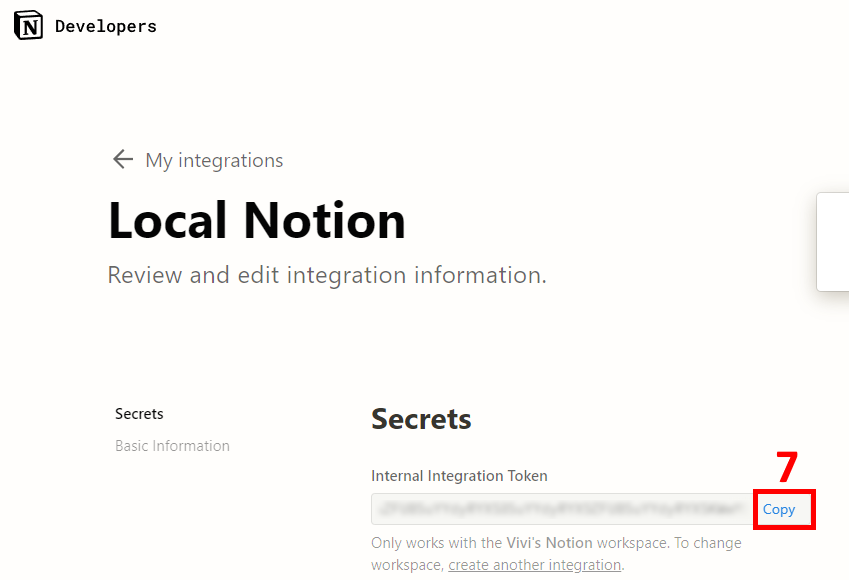
The screenshots above show an earlier Notion interface; use the current steps and Notion's internal-connection guide when menus differ.
Ordinary synchronization needs read access. The new CMS-creation command also needs insert-content and update-content capabilities to create its schema, populate its complete preset palette and move the temporary setup row to Trash. These are application requirements, not a reason to expose unrelated workspace content.
The workflow documented here uses an internal connection token. Other authentication methods mentioned in newer Notion documentation have not been verified with this CLI.
5. Granting access to your content
Creating a connection does not grant it content access. Connect the intended pages and databases before listing or pulling them.
-
Open the page or database you want Local Notion to read.
-
Open the page menu and choose
Connections. -
Choose
+ Add connection. -
Select the integration you created in
Section 4
.
-
Confirm access. Alternatively, use
Content access → Edit accessin the connection's configuration.
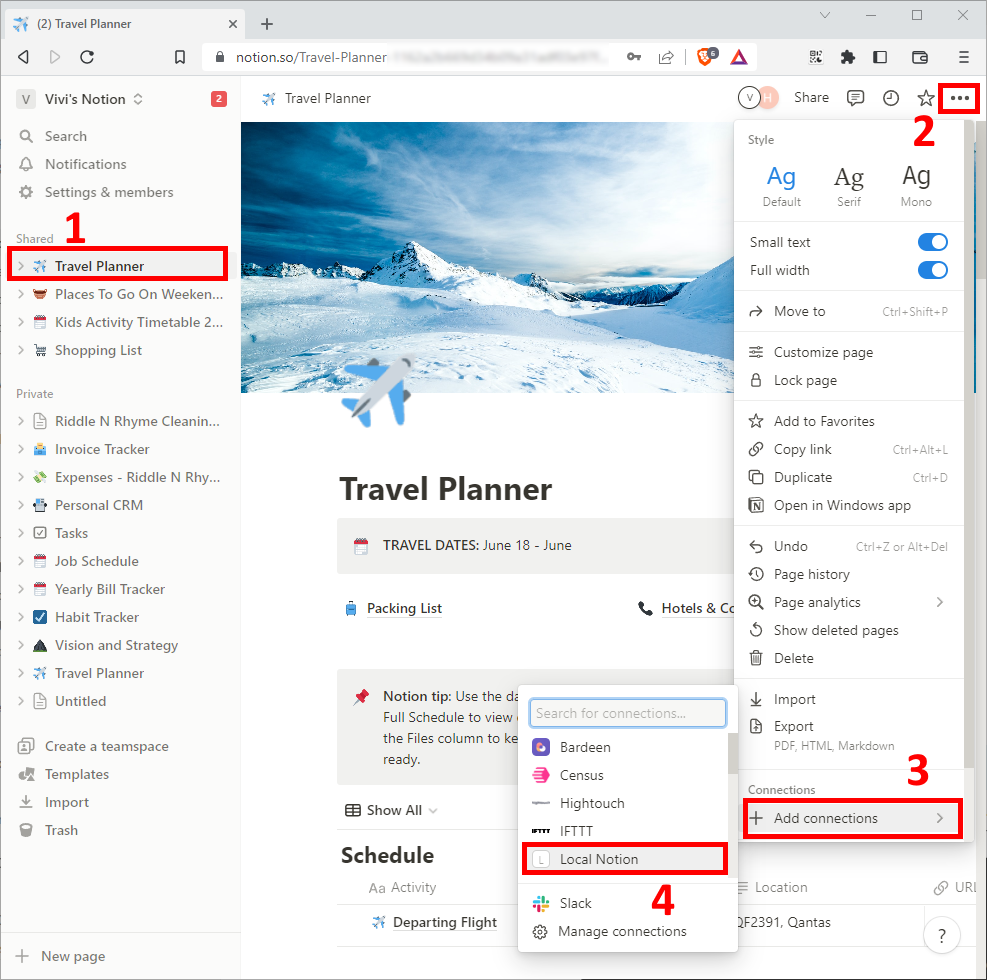
Confirm access before a large download. Use localnotion list with the intended credential source and inspect the returned object IDs. A connection can be valid yet see no content because the relevant page has not been shared with it.
If an expected object is missing, check the workspace, the connected parent and the connection's read capability. Access errors can look like missing objects, so verify permission before treating content as deleted. Connection access is also separate from the authentication rules of a website generated from that content.
6. Command-Line Interface
6.1 Usage
Open a terminal and choose an empty folder for a new Local Notion repository. For an existing repository, change into its folder or pass its path explicitly with --path. Keep the application installation folder separate from the content repository.
A command chooses the operation; its options choose the repository, objects and output behavior. Replace uppercase placeholders in the examples with your actual paths, UUIDs or credential values. Quote paths containing spaces and use the help from the executable you are actually running.
6.1.1 Example: Initializing a repo on the current working directory
mkdir my-notion
localnotion init --path "./my-notion" --profile backup --key NOTION_INTEGRATION_KEY
6.1.2 Example: Listing content the Notion connection can access
localnotion list --path "./my-notion"
localnotion list --path "./my-notion" --all
6.1.3 Example: Pulling all content accessible to this connection
localnotion pull --path "./my-notion" --all
-
The current directory is the default repository. Use
--pathwhen there is any ambiguity. -
Use
localnotion --helpandlocalnotion --versionto identify the installed command surface. -
Use
localnotion pull --help, substituting the command you need, for its version-specific options. -
Notion pages and databases are identified by UUIDs. A database ID, a data-source ID and a parent-page ID are different identifiers.
-
Use
listto find accessible content IDs; use the database ID returned by CMS creation when configuringinit --cms. -
If expected content is missing, check the connection's workspace and content access before retrying a large pull.
Separate the stages. A Notion edit, a local download, rendered HTML, a Git push and a working HTTPS page are different results. Inspect the stage that failed instead of repeating every command. A render uses stored content; it cannot fetch a Notion edit that was never pulled.
| Situation | Usual next operation |
| Check what is already in the local repository | status |
| Find content the connection can read | list |
| Fetch Notion edits and normally render them | pull |
| Rebuild output from stored objects | render |
| Repeat pulls after a successful one-off test | sync |
| Create a new blank website CMS in Notion | Source-version create-cms |
Version note. Command availability depends on the exact build. create-cms is implemented and verified in a development build. The public 1.6.3.7 release and earlier 1.5.0.12 executable do not include it. Run localnotion create-cms --help to check the executable you are using, and consult that build’s own help for its supported options.
Credential selection. For list, pull and sync, the supported lookup order is an explicit key, a nonempty key file, then the selected repository's stored key. Init is different: it stores its explicit key argument and does not read the key-file variable.
| Priority | Credential source |
| 1 | --key / -k for that invocation |
| 2 | A nonempty file named by NOTION_API_KEY_FILE |
| 3 | The selected repository's stored notion_api_key |
Repository Git settings can make pull, render and local cleanup operations stage, commit and push automatically. --render-mode readonly describes rendering behavior; it does not make the command read-only or disable Git publishing. Test content in a separate repository with automatic Git disabled when you need a local-only experiment.
6.2 Commands
Choose a command by the result you need, then use its installed help for the complete option list. The summaries below explain the operation and common workflow; old pasted argument lists are not a promise that every release has the same options.
status       Inspect the local repository
init         Create a local repository
clean        Clean locally managed storage
remove       Remove selected local resources
list         Discover accessible Notion content
sync         Repeat pulls until stopped
pull         Fetch Notion content and normally render it
render       Render stored local content
git          View or change repository Git settings (development build)
prune        Reserved command; currently unimplemented
license      Legacy heading; not in the current command set
create-cms   Create a blank Notion website database (development build)

localnotion --help
localnotion COMMAND --help
6.2.1 status
The status command reports the local repository's resources and storage paths. Use it to confirm that you selected the intended repository before a download, cleanup or render. Its local counts are not a count of everything in your Notion workspace.
Arguments:
| Common option | Default / purpose |
--path, -p |
Current directory; select the local repository |
--verbose, -v |
Off; show additional diagnostic output |
localnotion status --help
Example:
localnotion status --path "./my-notion"
Resources represent tracked content such as pages, databases and files. Objects store the underlying Notion data; graphs record relationships used to reconstruct content. A page can therefore involve more than one stored object. The reported folders are useful when checking whether attachments and output reached the repository you intended.
6.2.2 init
The init command creates local repository storage and configuration. Choose an empty destination folder and a suitable profile; do not reinitialize an existing site merely to pull an update. It does not create Notion page content or provision a server. Git options are off by default; enabling them can cause initialization to commit or push through the configured Git workflow.
Arguments
| Common option | Default / purpose |
--path, -p |
Current directory; folder to initialize |
--key, -k |
No stored key unless supplied; this value is passed into repository creation |
--cms, -c |
No CMS by default; supply the website database UUID |
--profile, -x |
backup; also offline, publishing or website |
--themes, -t |
default; rendering theme selection |
--log-level, -l |
info; file logging level |
--verbose, -v |
Off; additional console diagnostics |
--git |
Off; enable Git change tracking |
--git-push |
Off; enable automatic push after commits |
--nginx |
Off; generate Nginx hosting configuration |
--nginx-reload-cmd |
With --nginx, use the platform reload default unless overridden; runs from .localnotion/nginx when requested |
--apache |
Off; records an Apache setting, with no .htaccess generation implemented |
--override-objects-path, --override-pages-path, --override-db-path, --override-workspace-path, --override-cms-path, --override-files-path |
Override the relevant storage/output folder instead of its profile choice |
--override-themes-path, --override-logs-path |
Override theme or log storage; missing theme files can fall back to embedded defaults |
--override-mode |
Exposed option that is not applied; the profile determines offline or online mode |
--override-base-url |
Override the base used for generated content links |
Path overrides change where later operations read and write. Keep a record of any directories outside the repository, especially before cleanup or removal.
localnotion init --help
--key to init stores that supplied key in the repository configuration. Keep the repository private. Init does not resolve NOTION_API_KEY_FILE or copy that file's key into the registry.
Example:
mkdir my-website
localnotion init --path "./my-website" --profile website --cms CMS_DATABASE_UUID --key NOTION_INTEGRATION_KEY
For ordinary backup use, select --profile backup instead. A website repository needs the CMS database UUID, not the data-source UUID and not a page UUID. Initializing it does not add homepage rows; author those in Notion using the separate CMS Guide.
List, pull, sync and the development create-cms command can use a private NOTION_API_KEY_FILE. That is distinct from init storing an explicit --key. If you initialize without storing a key, keep a supported credential source available for later commands.
Git history, automatic push and Nginx generation are optional initialization choices. Review their installed options and resulting configuration before enabling them. Existing repositories keep their integration settings; changing a profile or recreating the folder is not a routine update step.
6.2.3 clean
The clean command removes unregistered resource-ID directories in locally managed storage according to the registry (
Section 7
). It is local maintenance, not a command for deleting Notion pages or discovering remote deletions.
Arguments:
| Common option | Default / purpose |
--path, -p |
Current directory; repository whose managed folders are cleaned |
--verbose, -v |
Off; additional diagnostics |
localnotion clean --help
Example:
localnotion clean --path "./my-notion"
This cleanup is based on resource-ID directories. A flat publication layout does not provide the same directory structure, so clean is not a general collector for every unreferenced file. Review custom paths and keep local files you need that cannot be regenerated. With repository Git publishing enabled, cleanup can also commit and push its resulting changes.
6.2.4 remove
The remove command removes resources from this local repository, not from Notion. Use the object IDs you intend to remove and check the path carefully. Removing everything is a different operation from removing one resource; inspect the installed help before choosing it.
Arguments:
| Common option | Default / purpose |
--path, -p |
Current directory; local repository to change |
--objects, -o |
UUIDs of selected local resources to remove |
--all |
Off; remove the local repository and its configured storage |
--verbose, -v |
Off; additional diagnostics |
localnotion remove --help
Example: Removing a page
localnotion remove --path "./my-notion" --objects PAGE_UUID
Selective removal follows the locally tracked resource, its descendants and media; it is more than deleting one rendered HTML file. Content that remains accessible in Notion can be pulled again, but local-only edits are not restored by that fact. Selective removal can trigger configured Git publishing.
--all can include custom configured storage folders outside the current directory. Inspect those actual paths before choosing a whole-repository removal. Neither form deletes the original Notion pages.
6.2.5 list
The list command discovers remote Notion content that the selected connection can access. It helps you find IDs and confirm sharing before a pull. It is different from status, which describes the local repository.
Arguments:
| Common option | Default / purpose |
--path, -p |
Current directory; read repository configuration/credential if available |
--key, -k |
Explicit credential override; otherwise use the lookup order in Usage |
--all, -a |
Off; include the accessible nested scope |
--filter, -f |
No title filter; applies to search, not explicit object lookup |
--objects, -o |
Fetch only the specified object UUIDs |
--verbose, -v |
Off; additional diagnostics |
Listing can search the connection's accessible content, not just rows of a configured CMS. Treat --all as integration-wide discovery rather than a promise that only one website database is queried. An explicit --objects lookup is not narrowed by the title filter.
localnotion list --help
Example: List the top-level objects only
localnotion list --path "./my-notion"
Example: List all objects
localnotion list --path "./my-notion" --all
Without --all, use the top-level listing as a starting point; include children when you need a deeper inventory. A missing result can mean missing connection access rather than missing content. A successful list does not download the complete website or prove it can be rendered.
6.2.6 sync
The sync command repeatedly performs pulls until you stop it with Ctrl+C or Ctrl+Break. First test the same scope with a one-off pull so errors, storage growth and any automatic publishing effects are visible before you leave a loop running.
-
On Windows, use an appropriate service runner or scheduled execution only after the foreground command has been verified.
-
On Linux, a systemd unit can supervise the process with its intended account, paths and environment.
-
On macOS, launchd can supervise a configured recurring process.
Arguments:
| Common option | Default / purpose |
--poll-frequency, -f |
30 seconds to wait after each complete pull |
--all, -a / --objects, -o |
Choose the pull scope |
--path, -p / --key, -k |
Repository selection and optional credential override |
--render |
True; render after pulling |
--render-type / --render-mode |
html / readonly; see pull/render below |
--fault-tolerant |
True; continue processing individual failures |
--force |
Off; refetch unchanged objects when deliberately needed |
--verbose, -v |
Off; additional diagnostics |
Sync inherits pull's options, including the Nginx reload controls described below. It adds a repetition interval; it does not change what a single pull is allowed to publish.
localnotion sync --help
Example:
localnotion sync --path "./my-notion" --all --poll-frequency 30
The loop waits the configured number of seconds after each full pull completes. It is not a fixed wall-clock schedule: a long download makes the time between starts longer. Repeated pulls can also repeat Git commit/push behavior when configured.
Run one writer for the repository. A scheduled sync, another terminal and an on-demand pull can otherwise compete for files and shared settings. Inspect logs as well as the exit or service status; fault-tolerant processing can continue past individual failures.
6.2.7 pull
The pull command fetches Notion data and normally renders the updated local content. Select a page/database UUID for a focused update or --all for the accessible scope. It is the right operation after an edit in Notion; rendering alone cannot fetch that edit.
Arguments:
| Common option | Default / purpose |
--objects, -o |
Pull the specified object UUIDs |
--all, -a |
Pull the complete selected scope; in CMS mode, all CMS items |
--path, -p |
Current directory; select the repository |
--key, -k |
Explicit credential override; otherwise use Usage's lookup order |
--render |
True; render fetched content |
--render-type |
html; the current renderer supports HTML, not PDF |
--render-mode |
readonly; ordinary content also exposes an Editable rendering mode |
--fault-tolerant |
True; continue after individual processing failures |
--force |
Off; download even unchanged objects |
--nginx-reload |
Off; allow the configured reload command to run |
--nginx-reload-force |
Off; force the Nginx generation/reload decision, but does not itself allow command execution |
--verbose, -v |
Off; additional diagnostics |
Choose a target rather than combining --all with an explicit object list. Nginx reload execution is gated by --nginx-reload and the repository's hosting configuration; --nginx-reload-force alone is not a server restart.
localnotion pull --help
Example: Pull a specific page
localnotion pull --path "./my-notion" --objects PAGE_UUID
Example: Pull entire workspace
localnotion pull --path "./my-notion" --all
For a website, shared navigation, framing, hierarchy and theme dependencies can affect more than the edited page. Confirm the intended objects reached the cache, then rebuild the affected composition; a full render may be needed after shared changes. Do not use --force routinely when ordinary change detection is working.
If a change is missing, trace it through Notion, stored objects, generated HTML, any transferred files and the served page. Check errors and skipped resources even when the command returns success. A Git failure can leave correctly rendered output uncommitted and unpublished.
6.2.8 render
The render command rebuilds output from stored local objects. Use it after changing themes or when dependent output needs regeneration. It does not fetch the latest Notion edits; pull those first when necessary.
Arguments:
| Common option | Default / purpose |
--path, -p |
Current directory; repository containing the stored objects |
--objects, -o |
Render the selected stored object UUIDs |
--all, -a |
Render all selected output; in a CMS repository, re-render CMS pages |
--render-type |
html; PDF output is rejected by the current renderer |
--render-mode |
readonly for ordinary resources; CMS output always uses ReadOnly |
--fault-tolerant |
True; continue after individual processing failures |
--verbose, -v |
Off; additional diagnostics |
Editable is an output/rendering mode, not a two-way editor that writes changes back to Notion. CMS rendering always uses ReadOnly regardless of the requested mode. The standalone render command has no pull-style --render Boolean because rendering is its purpose.
localnotion render --help
Example: Rendering a Page
localnotion render --path "./my-notion" --objects PAGE_UUID
Example: Rendering everything
localnotion render --path "./my-notion" --all
Rendering still writes output files and can invoke configured Git change control. --render-mode readonly is not a no-write or no-publish switch. For a private preview, use a separate repository copy whose Git enabled/push settings are disabled.
A rendered file is only one stage. Friendly website URLs may depend on generated Nginx mappings, and online assets may still load from remote URLs. Test the intended routes, media and interactions in the actual serving setup before calling a website update complete.
6.2.9 prune
The prune heading is retained for continuity. The command is registered but currently reports that it is unimplemented and returns -6. Do not use it as an automatic “remove everything deleted from Notion” workflow.
Arguments:
Current implementation: prune is unimplemented (handler returns -6).
Consult your installed release's help before assuming behavior from another version.
6.2.10 license
The license heading describes a legacy command. It is not registered in the current command set documented here. Older activation instructions are not a current installation step; if an older release exposes this command, use that release's own licensing documentation.
Availability:
localnotion --version
localnotion --help
For an older installation:
Consult that release's own help and licensing documentation.
Do not treat an old activation transcript as evidence of a current command.
6.2.11 create-cms
Availability: create-cms is implemented and verified in development. The current public v1.6.3 release, identified as 1.6.3.7, does not include this command. The following reference requires a development build whose own help lists it; confirm with localnotion create-cms --help before running the example.
create-cms creates one new Notion database with the canonical website CMS schema and preset choices. It is a starting structure for your own content, not a copy of the reference website.
localnotion create-cms --parent PARENT_PAGE_UUID --title "My Website"
Choose an ordinary Notion parent page connected to the integration. The command needs read, insert-content and update-content access. A database ID or data-source ID is not the parent-page UUID.
| Option | Meaning |
--parent |
Required accessible parent-page UUID |
--title |
Database title; default My Website |
--key, -k |
Explicit integration key |
--path, -p |
Optional existing repository used only to find its stored key |
--verbose, -v |
Additional diagnostic output |
Credential precedence is an explicit --key, then the private file named by NOTION_API_KEY_FILE, then the optional repository supplied with --path. That path is not an output folder and is not initialized or modified by creation.
$env:NOTION_API_KEY_FILE = "C:\Private\notion-key.txt"
localnotion create-cms --parent PARENT_PAGE_UUID --title "My Website"
On macOS/Linux, set that environment variable with export NOTION_API_KEY_FILE="/private/notion-key.txt" before the same command. Keep the key file outside the website repository and source control.
Success reports the new database UUID and Notion link. The completed database has 20 properties, eight Type options, four Status options, twelve Tags and 228 Themes, with their preset labels and colours. It has zero active content rows.
Notion's option limit requires one temporary Hidden setup row while the full palette is registered. The command moves that row to Trash; it is not permanently erased. No content, images, website routes, passwords, repository, Git remote or hosting configuration are cloned.
Each invocation creates another database. After a timeout or cancellation, inspect the parent and use any reported database/setup-row IDs before trying again. Retrying an ambiguous creation can create a duplicate; it does not repair the first result.
Create an empty local folder, initialize it using the returned database ID, then author your first content in Notion. Init does not read the key-file variable itself; later pull can use the supported credential source. For example:
mkdir my-website
localnotion init --path "./my-website" --profile website --cms NEW_DATABASE_UUID
localnotion pull --path "./my-website" --all
Creation and initialization alone do not make a homepage or publish a site. Follow Build your first website and the Notion CMS Guide to add Page or Section rows, select styles and prepare a deployment.
6.2.12 git
The git command displays or changes the repository's Git settings. It reads the git object in .localnotion/registry.json; it does not print the integration key, resource index or other registry content. Use --path to select the repository, or run it from that repository's working directory. Select the repository folder, not the registry file. The current directory is used when --path is omitted.
Availability: this command is a development addition. The public v1.6.3 release assets, identified as 1.6.3.7, does not contain it. Use a build whose own localnotion git --help lists these options.
localnotion git --path "./my-website"
localnotion git --help
| Option | Meaning |
--path PATH |
Existing Local Notion repository; defaults to the current directory |
--enabled true|false |
Enable or disable automatic Git change control |
--push true|false |
Enable or disable automatic push after an automatic commit |
Without setting options the command displays the current values. When setting options are supplied, it changes only those supplied and then displays the effective values. An omitted Boolean is left unchanged; use an explicit false to turn it off. Supply one true or false value for each setting option. An unchanged assignment leaves the registry unchanged; an actual change uses the normal repository save transaction.
Enable local Git history while keeping automatic push off:
localnotion git --path "./my-website" --enabled true --push false
The command prints the effective settings as JSON. The preceding example returns:
{"git":{"enabled":true,"push":false}}
Enable automatic history and push after preparing and checking the Git remote:
localnotion git --path "./my-website" --enabled true --push true
Change only the push preference, disable automatic change control while retaining that preference, or explicitly disable both settings:
localnotion git --path "./my-website" --push false
localnotion git --path "./my-website" --enabled false
localnotion git --path "./my-website" --enabled false --push false
This command changes the configuration used by later content operations. It does not initialize Git, stage files, commit, push, contact a remote, pull Notion content or render the website. Opening the repository still uses its normal load lifecycle, which can restore missing themes, initialize local logs and complete an interrupted registry save. Stop any running sync or other repository writer before changing these settings, then restart it after the change so it loads the new configuration. Configure Git identity, remotes, branches, upstream selection and authentication with ordinary Git tools.
7. Local Notion Registry
The .localnotion/registry.json file stores repository configuration and its resource index. It ties the downloaded objects, relationship graphs, files and generated output together. Its contents are operational state; they are not a replacement for editing the source content in Notion.
{
  "version": 1,
  "notion_api_key": "NOTION_INTEGRATION_KEY",
  "default_themes": ["default"],
  "paths": {
    "mode": "offline",
    "repository_path": "../",
    "base_url": "",
    "objects_path": ".localnotion/objects",
    "graphs_path": ".localnotion/graphs",
    "themes_path": ".localnotion/themes",
    "files_path": "files",
    "databases_path": "databases",
    "workspace_path": "workspaces",
    "pages_path": "pages",
    "logs_path": ".localnotion/logs",
    "download_external": false
  },
  "git": {
    "enabled": false,
    "push": false
  },
  "resources": []
}
The JSON above is an illustrative subset, not a file to paste over an existing repository. A real registry has additional version-specific configuration, resource records and, for a CMS site, generated route/composition information.
| Area | What it controls or records |
notion_api_key |
A stored integration credential, when one was supplied |
default_themes |
Default rendering theme selection |
paths |
Object, graph, media and output locations and link mode |
cms_database |
The configured website CMS database, when CMS is enabled |
resources |
Tracked Notion content and its local render information |
cms_items |
Generated website routes, parts and selected framing |
git.enabled / git.push |
Optional change tracking and automatic transfer |
nginx |
Optional web-server configuration generation |
Keep configuration and content separate. Editing a cached object or generated HTML is temporary; a later pull/render can replace it. Edit prose and website metadata in Notion. Change themes or repository settings only when those are the intended customization.
Keep secrets private. A registry can contain an integration key, and generated website mappings or persisted properties can contain authentication data. A private repository and its history can therefore contain more than the public website. Use redacted examples when sharing diagnostics.
Recover the right stage. If the repository points at the wrong folder, correct that selection. If Notion access is missing, repair the connection rather than deleting the cache. If rendered output is stale, inspect the saved objects and rebuild dependencies. If Git or hosting fails, keep the valid local result and diagnose transfer/activation separately.
7.1 Git change control
The registry has two Git settings. git.enabled controls whether participating commands run automatic change control; git.push controls the push step within that workflow. They do not describe a second Notion synchronization direction. Both settings default to false. Setting enabled to false stops automatic Git work without clearing push; the stored push preference applies again if enabled is later set to true.
git.enabled |
git.push |
Result on later participating commands |
false |
false |
No automatic Git change control |
true |
false |
Stage changes and create local commits; no automatic push |
true |
true |
Stage changes, create commits and push to the default Git destination |
false |
true |
Automatic change control is disabled; push remains a stored preference |
Use localnotion git in a build that provides the command to inspect or update these values. Older releases require a careful edit of only the git object in the existing registry. Preserve the rest of the file; the JSON example above is an illustrative subset and must not replace a live registry.
Automatic change control stages all changes. Generated files and registry data can contain credentials or authentication information, so choose an appropriate private repository and protect its history. The git settings command deliberately displays only the two supported settings.
Before enabling automatic push, inspect the Git repository, destination and branch with standard Git commands:
git -C "./my-website" status --short
git -C "./my-website" remote -v
git -C "./my-website" branch -vv
git -C "./my-website" config --local --get user.name
git -C "./my-website" config --local --get user.email
Configure a Git repository, author identity and the intended branch/upstream before using automatic change control. A remote can deploy a website, store a private backup or have another purpose; its name alone does not identify the destination. Use init --git and init --git-push only when creating a new Local Notion repository. Use the git command to change an existing repository without reinitializing it.
Check each publication stage separately: local rendered output, the intended Git commit, the receiver's revision and the served HTTPS page. A successful command exit alone does not establish that a Git push or server activation succeeded.
Notion CMS Guide
Use Notion to write your pages, arrange sections and build a website you can host yourself. The CMS guide walks through page layouts, themes, images, galleries and publishing, with a complete reference when you need it.